Introduction:
Master
Pages in Asp.net allows you to control the layout, design and common controls
of all the pages in the website/web application. With a single master page you
can define the look and feel of your application which includes multiple
content place holders. Along with Master Pages you can work with themes to
provide the user with great User Interface. In this article we see an overview
of how to
- Create a Master page with single and multiple content place holders,
- Add Content Pages,
- Nested Master Pages.
- Programming the Master Page,
- Creating themes for the application and
- Finally we will see how we can work with multiple themes.
Creating
a master page is very simple. Just in your website, right Click on the solution
explorer, select add new item and then select the Master page from the Pop up
window, as shown in the figure. Master page comes with extension .master which
consists of all the common elements (a template/layout) for the site.

By
default the master page comes with two content place holders place in it. The
code of the master page is as follows:
<%@ Master Language="C#"
AutoEventWireup="true"
CodeFile="MasterPage.master.cs"
Inherits="MasterPage"
%>
In
the above @ Master directive identifies it as master pages, whereas all other
pages have @page directive.
<html
xmlns="http://www.w3.org/1999/xhtml">
<head
runat="server">
<title>title>
<asp:ContentPlaceHolder
id="head"
runat="server">
asp:ContentPlaceHolder>
head>
<body>
<form id="form1" runat="server">
<div>
<asp:ContentPlaceHolder
id="content"
runat="server">
asp:ContentPlaceHolder>
div>
form>
body>
html>
The
content place holders in the above are used to place the static content or
dynamic content by using the asp.net server controls in the site. The content
place holder is placed in the header section and in the form tags which in
general allows the users to place each page content in the header and body
part, but there is no such a restriction to place a content place under a
particular tag nor there is an restriction for the number of content place
holders to be used. In the later part of the article we will see in details
about the layout and usage of the content place holder.
Content Place holder allows the user to flexibly maintain the site content with
a common page layout.
By this time as we have created a
Master page, now we need to add a content place holder to the site. Right click
on the Solution explorer, select add new item and then select content place
holder from the pop up window:

This adds the content place holder
to the site with the following code:
<%@ Page Title="" Language="C#"
MasterPageFile="~/MasterPage.master"
AutoEventWireup="true"
CodeFile="Default2.aspx.cs"
Inherits="Default2"
%>
<asp:Content
ID="Content1"
ContentPlaceHolderID="ContentPlaceHolder1"
Runat="Server">
asp:Content>
In
order to create a nested master page follow the below steps. Repeat the above
previous steps to add a master page and then again right click on the solution
explorer and select add new item and select master page from the installed
templates and then select the ‘select master page’ checkbox and name the master
page as nestedmaster.master, as shown in the below figure.

From the below code we can observe the difference a master page, content page and nested master page.
Master Page:
<%@ Master Language="C#"
AutoEventWireup="true"
CodeFile="MasterPage.master.cs"
Inherits="MasterPage"
%>
Nested
master Page:
<%@ Master Language="C#"
MasterPageFile="~/MasterPage.master"
AutoEventWireup="true"
CodeFile="NestedMaster.master.cs"
Inherits="NestedMaster"
%>
Content
Page:
<%@ Page Title="" Language="C#"
MasterPageFile="~/MasterPage.master"
AutoEventWireup="true"
CodeFile="Default2.aspx.cs"
Inherits="Default2"
%>
By this we have created a nested master page for the site. Now wee need design the child master page.
<asp:Content ID="Content1" ContentPlaceHolderID="ContentPlaceHolder1" Runat="Server">
<div>
<h1>Image
Slide Showh1>
<h3>Product's
Show Case:h3>
<asp:Image ID="Image1" runat="server"
ImageUrl ="~/Blue
hills.jpg" Height="173px"
Width="287px"
/>
<asp:ContentPlaceHolder
ID="ContentPlaceHolder1"
runat="server">
asp:ContentPlaceHolder>
div>
asp:Content>
Activity: Developing a Theme Manager application.
Creating Page Layout:
As
we have already seen how to create a master page for our application. We will
start with creating a page layout. We can create a page layout by using
different techniques and tools. We can create the Page Layout by using html and
CSS or by using a web design tool like Photoshop or any other. In our example
we will create a page template by using Html and CSS. We can create a simple
two column page layout by using either div tags of the html or in design view
just by dragging the table from the toolbox. The later one you can try it by yourself,
here we will design the page layout by using div tags and CSS. The following
html code shows you the two column page layout and the design effects for the
layout are applied by using the CSS code as shown below:
HTML Layout:
<div id = "Container">
<div id ="Container">
<div id="header">
div>
<div id="SideBar">
div>
<div id="Content">
div>
<div id="Footer">
div>
div>
From the div tags id it is clear
that now we have header, side navigation, content and footer.
Now by using the following CSS we
can arrange the div’s in the Page.
- Right click on the solution explorer select add new item and then select StyleSheet from the pop up window.
- Name the file as ‘AcquaStyleSheet.css’
- Copy and paste the below code to your stylesheet.

CSS Code:
body
{
margin:20px 20px 20px 20px;
padding: 0;
font-family: Georgia, Times, "Times New
Roman", serif;
color: black;
width: 960px;
border-right: 1px solid black;
background-color:#98B3F6;
}
#header
{
background-color:#1B7DCE;
margin:10px 10px 0px 10px;
height:120px;
overflow:hidden;
}
#SideBar
{
float: left;
width: 160px;
margin-left: 10px;
padding-top: 1em;
height:900px;
}
#Content
{
padding-top: 1em;
margin: 0 12px 0 180px;
background-color:White;
overflow:hidden;
}
#Footer
{
clear: both;
background-color: #62645C;
padding-bottom: 1em;
border-top: 1px solid #333;
padding-left: 200px;
}
Now moving further we add some more
common features that we will available through the website, the title, tag-line
and Menu.
Title and Tag Line:
Add the following html code inside
the header div tag which displays the title and tag line of your site.
<h1
class ="Title">Mysite
Titleh1>
<span
class ="TagLine">Mysite
Tag LInespan>
and the css code goes here:
#header
.Title
{
color:White;
}
#header
h1
{
margin:10px 40px 10px 40px;
}
#header
.TagLine
{
color:White;
margin:40px 40px 10px 70px;
}
Asp.Net provides wide range for
control for site navigation you can directly use them for your site or use the
following simple html tags to design the navigation for your site.
Designing the Menu:
<ul
class ="Menu">
<li><a href ="#">Homea>li>
<li><a href ="#">AboutMea>li>
<li><a href ="#">Articlesa>li>
<li><a href ="#">ContactUsa>li>
ul>
CSS Code:
.Menu
li
{
display:inline;
margin:0px;
}
.Menu
a
{
text-decoration:none;
background-color:Blue;
padding:5px;
color:White;
border-right:4px
solid Maroon;
margin:0px;
border-left:none;
}
.Menu a:hover
{
background-color:Maroon;
padding:5px;
border-right:4px
solid Blue; margin:0px;
}
Finally you can also apply the css
style for the Grid Control the following css code shown here can be applied to
the Asp.Net Grid Control.
.gridAlternatingRowStyle
{
background-color:White;
}
.gridEditRowStyle
{
background-color:#2461BF;
}
.gridFooterStyle
{
background-color:#98B3F6;
color:White;
font-weight:bold;
}
.gridHeaderStyle
{
background-color:#1B7DCE;
font-weight:bold;
color:White;
}
.gridPagerStyle
{
background-color:#98B3F6;
color:White;
text-align:center;
margin:20px;
border:1px solid black;
background-image:url(Images/abc.gif);
}
.gridRowStyle
{
background-color:#EFF3FB;
}
.gridSelectedRowStyle
{
background-color:#D1DDF1;
color:#333333;
}
.grid
{
border:none;
width:100%;
}
The Grid View code goes here:
<EditRowStyle
CssClass ="gridEditRowStyle"
/>
<FooterStyle
CssClass="gridFooterStyle"
/>
<HeaderStyle
CssClass ="gridHeaderStyle"
/>
<PagerStyle
CssClass="gridPagerStyle"
/>
<RowStyle CssClass ="gridRowStyle"
/>
<SelectedRowStyle
CssClass ="gridSelectedRowStyle"
/>
Using skin file you can apply styles
to the server controls. The following samples show the usage of a skin file.
The code in skin file is same as the server control syntax except that id
attribute is eliminated for the control.
<asp:TextBox
ID="TextBox1"
runat="server"
BorderColor="#FFFFB7"
Width="288px">
asp:TextBox>
<asp:Button
ID="Button1"
runat="server"
BackColor="#FF9933"
ForeColor="White"
Text="Button"
Width="119px"
/>
<asp:GridView
ID="GridView1"
runat="server"
CellPadding="4"
ForeColor="#333333"
GridLines="None">
<AlternatingRowStyle
BackColor="White"
/>
<FooterStyle
BackColor="#990000"
Font-Bold="True"
ForeColor="White"
/>
<HeaderStyle
BackColor="#1B7DCE"
Font-Bold="True"
ForeColor="White"
/>
<PagerStyle
BackColor="#98B3F6"
ForeColor="#333333"
HorizontalAlign="Center"
/>
<RowStyle
BackColor="#EFF3FB"
ForeColor="#333333"
/>
asp:GridView>
Adding Some Style for home
Page(Content Pages):
As we have seen how to use the skin
files. Now in our application we will add Feedback form using the above skin
file styles. The above style defined for textboxe and button will be applied to
all the controls in our Feedback form. But if we want to be more specific for
each individual textboxes we can use the SkinID property in the skin file for
the controls as shown below:
Coming back again we'll define some
more style in the css page for "Quotes" and "Images".
The following code shows the code
for Displaying Images.
.imagecells
img
{
width:140px;
height:100px;
border:2px solid Gray;
padding:15px;
margin:15px;
background-color:#98B3F6;
border-style:inset;
}
The following css can be used to
display quotations.
.quotehomepage blockquote {
font: italic 1em/1.6em Georgia, "Times New Roman", Times,
serif;
width: 300px;
background: url(/ThemeManager/Images/closequote.gif)
no-repeat right
bottom;
padding-left: 18px;
text-indent: -18px;
float: right;
margin: 20px 0 10px 10px;
color: #999999;
}
.quotehomepage blockquote:first-letter {
background: url(/ThemeManager/Images/openquote.gif)
no-repeat left top;
padding-left: 18px;
font: italic 1.4em Georgia, "Times New Roman", Times,
serif;
}
We can define styles for the span
tag which can be used to highlight the elements
.welcome span
{
color:#98B3F6;
}
The styles we have created till now
can be applied as a theme for the application. We can create more css styles,
as the one we have created above and we can allow the user to select one.
Asp.net provides you a flexible way to achieve this. Follow the below steps to
create themes in your application: The theme folder consists of the Skin files
and Cascading Style sheets.
As we have seen how to create a
style sheets and skin files now we will see how to use them for themes. The
Skin files allow you to apply styles same as the cascading style for the
application. You can apply styles to the site by either using css style sheet
or skin file or both. Mainly you can use the skin file to apply styles to the
server control.
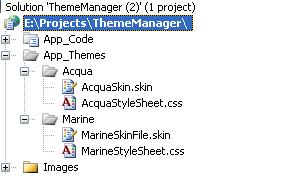
Adding Themes Folder:
- Right click on the solution explorer and then select 'Add Asp.Net Folder' and then select 'Theme'. This adds the Theme Folder to the application
- In the App_Theme, add a new Theme folder and you can give your own name for the folder.
- In the Theme Folder add css and skin files to it.
- By repeating the above steps you create as many themes for the application.

To apply the theme for the
application, apply the following settings in the web.config.
Page Level Settings:
To apply the theme settings at the
page level, set the theme attribute to the theme name at the @ page directory
as shown:
<%@
Page Title="" Language="C#"
MasterPageFile="~/MasterPage.Master" Theme ="Acqa"
Before I could discuss about the
code for managing dynamic themes. I want you to refer this excellent article
about dynamic themes in code project at the below link:
Now here we'll see an alternate
method to achieve the same:
The following code shows you to
select dynamic themes from the available Themes:
DropDown Control
< asp:DropDownList ID="DropDownList1" runat="server"
AutoPostBack="True"
onselectedindexchanged="DropDownList1_SelectedIndexChanged">
Select Any Theme
Acqua
Marine
protected void
DropDownList1_SelectedIndexChanged(object sender,
EventArgs e)
{
Configuration config = WebConfigurationManager.OpenWebConfiguration("~/");
//Get the required section of the web.config file by using
configuration object.
PagesSection
pages = (PagesSection)config.GetSection("system.web/pages");
//Update the new values.
pages.Theme = DropDownList1.SelectedItem.Text.ToString();
//save the changes by using Save() method of configuration
object.
if
(!pages.SectionInformation.IsLocked)
{
config.Save();
Response.Redirect("Default.aspx");
}
else
{
Response.Write("");
}
Conclusion
In
this article we have seen about the Master pages and Themes. Hope you
have
enjoyed reading this article and the content in the article has helped in
your
assignments. Any suggestions or feedback would be appreciated
Nice...
ReplyDelete